Fix “Upload: Failed to Write File to Disk” Error in WordPress #
Do you see the message “Upload: Failed to Write File to Disk” when uploading files in WordPress?
This common error can be very frustrating for novice users.
In this article, we will show you how to fix the “Upload: Failed to Write File to Disk” error in WordPress.
What are the causes of the Upload: Failed to Write File to Disk message in WordPress? #
This error can occur due to a number of reasons. However, the most common is incorrect folder permissions.
Every file and folder on your website has a set of permissions. The web server controls access to files based on these permissions.
Incorrect permissions to a folder can remove your ability to write files to the server. This means that your web server cannot create or add new files to this particular folder.
If you try to upload images or any other files from your WordPress admin area, you will get one of the following error messages:
- WordPress failed to write to disk
- WordPress has failed to upload due to an error failed to write file to disk
- Unable to create directory wp-content/uploads/2016/03. Is its parent directory writable by the server؟
Fix Upload: Failed to Write File to Disk Message in WordPress #
First, you need to connect to the WordPress site using an FTP client.
In this tutorial, we use a client FTP FileZilla free. If you use some other FTP software, it might look a little different
How are files uploaded via ftp?
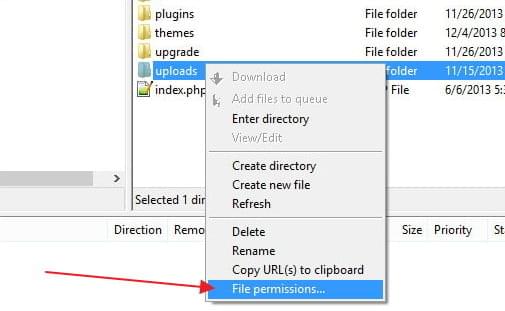
Once you are connected, you need to right-click on the wp-content folder and select File Permissions.

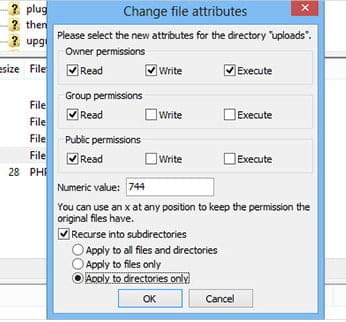
This will bring up the File Permissions dialog in the FTP program. It will show you the file’s permissions for owner, group, and audience.

755 must be entered in the numeric value field.
Next, you need to check the box next to “Recurse into subdirectories”.
Finally, you should click on the “Apply to directories only” option.
Click on the OK button to continue.
FTP will now set folder permissions to 755 and apply them to all subfolders within wp-content.
This includes the Uploads folder where all your photos are stored.
You also need to make sure that the file permissions are correct for individual files in your wp-content folder.
Again, right-click on the wp-content folder and select File Permissions. This time we will change the file permissions.
Enter 644 in the numeric value, then check the box next to “Recurse into subdirectories.”
Finally, you should click on the “Apply to files only” option.
Click on the OK button to continue. FTP will now set file permissions to 644 for all files in the wp-content folder.
You can now visit the WordPress site and try to upload the files.
The explanation of fixing the “Upload: Failed to Write File to Disk” error in WordPress has been completed


